Tuesday, July 31, 2012

D&D Plot Idea - The Secret of Spirit Lake


Here is a little D&D plot idea that I came up with for a party of first-level adventurers. Feel free to use it for your next gaming session if you want.

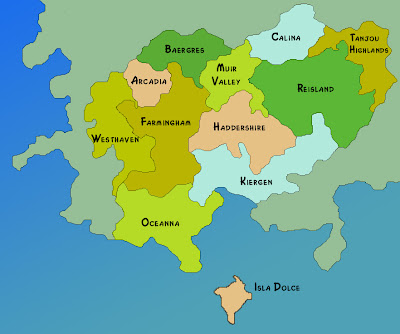
Westhaven Map


This adventure begins in the civilized territory of Westhaven, which is marked by five sizable dwellings (Applegate, Darrow, Kielport, Millsend and Thornberry).  The small town of Millsend is located on the river Vinewater, north of Spirit Lake.  The inhabitants of Millsend, which include several hundred families, are predominantly agricultural laborers. Recently, the town’s tree cutters have reported sightings of strange creatures in the woods surrounding Spirit Lake, causing them to abandon their logging sites.  Since Millsend depends on the regular flow of logs to the other towns to sustain its economy, the town is in need of someone to investigate the woods and hopefully rid them of any unwanted visitors. 

Spirit Lake sits at a higher elevation than the surrounding countryside, resting just above the base of the mighty Slumbering Hills.  Very few people have ever wandered up into the hills and returned to tell about it.  However, the lower region, including Spirit Lake, has been considered safe until the recent sightings.  The lake is virtually surrounded by forest, with some obvious logging activity creating an opening to the south, where the Vinewater flows down into the lowlands.

The creatures which have alarmed the loggers are satyrs, which have come down from the mountains to the south.  If any of the loggers is asked for information about the creatures, their reports will vary from seeing strange lights or devil-shadows to hearing strange voices or even sweet music.  The satyrs are not hostile, but do not wish any interaction with people.  However, it will be the task of the adventuring party to make contact with the satyrs, and see if a solution to the logging problem can be reached.

Farther up the hillside, the woods turn faerie in nature.  It’s quite possible that anyone adventuring up the hills south of Spirit Lake will encounter other fey creatures such as pixies, dryads or sprites.  However, the players should be discouraged from adventuring south until they are at a higher level.  Encountering the satyrs will reveal that they have been temporarily exiled from their woods for excessive revelry.  The satyrs are not allowed to return (by the centaurs who exiled them) until they obtain a special magic artifact to prove their worth.  The magic item will have to be located by the adventurers to rid Spirit Lake of the satyrs.

The magic artifact that the satyrs require is a red crystal ball, which was mischievously taken from the centaurs by a couple of pixies, and thrown into the waters of Spirit Lake. Finding the crystal ball would be nearly impossible, but the pixies finally revealed to the chief centaur that they saw it float down the Vinewater, into the lowlands.  The crystal ball is but one of a pair that can spy on each other.  So, the person who peers into one crystal ball would be able to peer out of the second, and vice versa.  The satyrs are in possession of the blue crystal ball, but will not offer it freely to the adventurers.  Instead, they will ask the party to bring them some fine wine as compensation for loaning out the blue crystal ball. Once the satyrs have their wine, they will hand over the blue crystal ball so that the party can use it to find the other one.

The fine wine can be purchased at various shop locations in Westhaven, although it would be quite expensive.  The wine can also be acquired by thievery, or from Vinberry Cellars, outside the village of Thornberry.  The Vinberry winemaker will give a few bottles in exchange for ridding his wine cellar of a few beasties, namely giant spiders and rats.  If the party tries to give the satyrs cheap wine, they will reject it after inspection (opening the bottle).

Once the adventurers have the blue crystal ball from the satyrs, they can peer into it to try to locate the red crystal ball.  However, since only the red ball’s surroundings will be revealed, they will have to piece together clues to determine its whereabouts.
Thursday, July 26, 2012

Dungeons of Dredmor Review


If you are a fan of dungeon-crawl PC games, you’re going to want to give Dungeons of Dredmor a try. Based in a 10-level labyrinth, Dredmor offers up everything that makes for a great dungeon crawl…namely lots of weapons, monsters, skills and other items to use in attaining your goal, the eventual defeat of Lord Dredmor himself.

PC Gamer US named Dungeons of Dredmor their Top Indie Game of 2011. Dredmor is set apart from other dungeon crawls or rogue-like games by its graphics and sound. Not only that, but Dredmor has a silly sense of humor to boot, with monsters issuing funny insults faster than you can draw your Clockwork Chainsword. Best of all, Dungeons of Dredmor costs only $4.99. You won’t find a better deal out there.

As with any good dungeon delve, Dredmor starts off with a character generation system which offers  a lot of variation, depending on what type of persona you wish to have. The basic game boasts 33 different skills, while the expansion packs offer even more. You get to choose from typical RPG skills such as Swords and Dual-Wielding, or the more creative Mathemagic and Archaeology. Once your skills are chosen, you can’t go back and select differently, so thoughtfulness here is key. Or, you can have the game select your 7 skills randomly for you (this is fun, but often leads to a quick death).

The 33 skills are listed here:
Warrior
Swords • Axes • Maces • Staves • Dual Wielding • Shield Bearer • Berserker Rage • Unarmed Combat • Master of Arms • Smithing

Rogue
Archaeology • Burglary • Archery • Thrown Weapons • Tinkering • Fungal Arts • Artful Dodger • Perception • Assassination

Wizard
Blood Mage • Golemancy • Fleshsmithing • Mathemagic • Psionics • Necronomiconomics • Viking Wizardry • Astrology • Promethean Magic • Magic Training • Ley Walker • Wand Lore • Vampirism • Alchemy

Once your character is generated, it’s time to drop your newly created dungeon-fodder onto the first level. There, you can view all of your many statistics that will impact your progression in the game. Since Dredmor is normally played in Perma-death mode (meaning you can’t reload your character after death), it’s a good idea to pay attention to the small details. You can also view your very limited starting inventory, including any equipped items. Now, you’re ready to venture forth into the dungeon.

The ten dungeon levels in Dredmor are all roughly the same size, and each level takes about 1 ½ hours to clear depending on how quickly you progress. Each level is randomly generated for loads of fun replay. It’s pretty common to lose a lot of characters in the game’s first few levels, especially when you’re trying out different skill combinations. So, having a flippant attitude toward character death is important.

The dungeon levels each have a different look to them, but each level basically contains the same kind of stuff…lots of monsters, more items than you can carry, a few shops to purchase and sell items, statues to break, chests to unlock…you get the picture. However, the variety and replayability keep Dredmor from becoming mundane. Also, the graphics and sounds lend a style to the game that other dungeon crawl games don’t offer.

One feature of Dungeons of Dredmor that is a little different is the Monster Zoo, a collection of 100 monsters in a single room. Each level (starting with Level 2) has a monster zoo, meaning that you better be prepared for one any time you open a door. As you might expect, the zoos take a little while to clear out, and usually feature a “boss” or two. These can be deadly when attacking with hordes of normal monsters.

Every time your character levels up, you get to choose a new skill level for one of your chosen skills. This is where games are won and lost, because the abilities gained at different skill levels vary so greatly. For instance, Level 2 of the Golemancy skill allows you to create a small golem for protection in battle, a good option to have! Getting certain skills to their highest level quickly is usually a good strategy for successful Dredmor gameplay.

Each time your character dies, he will be listed in the High Score list (along with a tombstone). You will quickly fill up the Top Ten slots on the high score list as you learn the best ways to play. It’s quite routine to have characters pass away after only a few fights, while getting characters to make it down a few levels is challenging indeed.

After a few tries with different skillsets, I was able to get a couple of characters down to Dungeon Level 4 before they died. These characters were most always the armored fighter types, with my wizard-like creations generally getting slaughtered in the first two levels. For some reason, the dungeon’s fourth level seems to be where the monsters ramp up a bit, and I’ve been taken out more than once by a single foe after I had cleared out a Monster Zoo.

The shops are very important places to visit. You’ll find a variety of items there which you may or may not be able to afford. Certain skills can increase your ability to find loot. That becomes key if you want to do a lot of item purchasing, rather than simply finding the items that you need at some point. Occasionally, you can find a shop on the first few levels with an ultra-powerful item, such as a sword or wand. Usually, such an item is not affordable at the time you first visit the shop, but you can always come back later and acquire it when you get the needed funds.

In my current game, I’ve blown through level 4 for the first time, and have made it all the way down to Level 7. I’m thinking that this character has a chance to go all the way. Here is my Character Build:

Berserker Rage – For the general combat bonuses.
Fleshsmithing – I’ve found the Knit Tissue ability at skill Level 2 absolutely essential for extended survival.
Mathemagic – Froda’s Jump Discontinuity (Level 1 skill) has gotten me out of many a sticky battle, especially against a hard foe or a cluster of opponents when my life level dropped quickly.
Promethean Magic – The fire-based skills at levels 1 and 4 offer fire-ball like spells which can take out several monsters at once. I like to use to deplete monster hit points this when I first enter a room, and then finish them off with my weapon.
Perception – Allows you to see things, especially traps, more easily. This is very useful when you are a low-level character.
Burglary – The Lucky Pick skill at level 2 allows you to always have some lockpicks on hand.
Archaeology – Perhaps my favorite skill, you start with the Fedora – a hat with better than average ability modifiers. Ancient Kronian Ritual at Skill Level 5 lets you use each Item-Enhancing Anvil twice instead of once. I try to max this skill as soon as possible.

Other skills that I like, but couldn’t work into this character build are Dual-Wielding, Assassination, Viking Wizardry and Vampirism. The latter skill lets you regenerate your life points from the dead corpses that you kill. However, you can’t use food to restore your life, so you have to keep killing things to survive. Also, I’ve actually found using a strong shield preferable to the Dual-Wielding skill.

If I do ever get down to Level 10 and defeat Lord Dredmor, I will restart with a different type of character, maybe one that creates golems or deals in Necromancy. Whatever I decide, I know that I’ve already gotten my money’s worth out of Dungeons of Dredmor.

Saturday, July 14, 2012

My RPG Map Banner


I recently came across a great idea for an enhancement to my role-playing game experience. I decided to have a large, high-quality vinyl banner printed, depicting a huge dungeon map. This will allow me to have a large dungeon at my disposal any time I need one. I used Banners On The Cheap to print my banner.

The rationale behind creating the huge dungeon map is that I would be able to use portions of the map for any RPG session. Since the map is printed on a 4’ x 8’ banner, it can easily be used on a table-top, floor, wall or other flat surface. Portions of the map not being used during any given gaming session can simply be folded up or covered, to be used at some later time.

To design the dungeon map for the banner, I used the Random Dungeon Generator at DizzyDragon.net. This is currently my favorite free dungeon generator on the web. It doesn’t have as many features as some of the other free dungeon generators out there, but it uses predefined dungeon tiles, designed to give the dungeon an authentic feel. Most other dungeon generators can only create rectangular shapes, but the one at DizzyDragon.net is able to seamlessly combine the tiles into a realistic-looking map, complete with caverns, pools, rubble and anything else you can imagine that would populate a massive dungeon.

Once I had the idea for the map fleshed out, I headed over to Banners On The Cheap to determine what size map I should create. I decided on a 4’ x 8’ banner, meaning that my dungeon map should be roughly the same proportion, to keep the aspect ratio consistent, which would hopefully result in the best resolution and the highest quality map possible. Banners on The Cheap has their banner sizes listed in a drop-down menu on their homepage, so deciding on an appropriate size and material for my banner was quick and easy.

After determining my banner size, I went back to DizzyDragon.net to create my dungeon map. The dungeon generator maxes out at 200 squares, both high and wide. I knew that I wanted my dungeon to be about half as tall as it was wide in order to fit my custom banner. Therefore, I set the width at 200 squares, and the height at 100 squares. If each square represents 10’, that dungeon will be well over 1/3 of a mile wide!

The dungeon generator at DizzyDragon.net also creates room contents for each chamber. I didn’t need these for my map, but since I have the seed number of my random map, I can go back and reload the map on their site at any time and have random room contents generated. My dungeon contains over 1500 rooms, so it will be nice to have a head start on populating it with creatures and features.

Once I had generated my design, I checked the entire map to make sure that the dungeon tiles were distributed well.  Satisfied, I used a free .pdf creation tool called CutePDF to save the entire website as a .pdf file. Once saved, I selected only the map portion, and imported it at high resolution into a free photo editing program called GIMP2. Once I had the map imported, I saved it, first as a .bmp file, then as a .jpg file. The .bmp file was very large, but I wanted to make sure that I kept the graphic resolution as high as possible (sometimes, .jpg files can lose a little bit of resolution.) Be sure to check the resolution of your graphic file when you’re finished. It should look pretty much like the original map design for optimum printing.

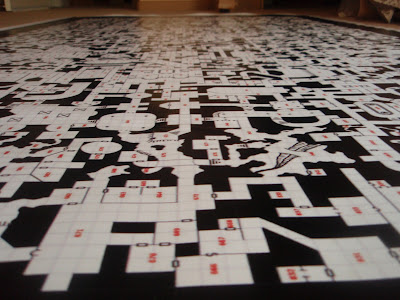
Here's what my final map file looks like:

Huge Dungeon Map
Dizzy Dragon Dungeon Map
You can get the .jpg file HERE.

Once I had my .jpg file saved, and was satisfied with the resolution, I went back to the Banners On The Cheap website. Their image uploading process is super simple, so I was able to load my map quickly. My large .jpg file ended up being a little over 4 MB, so it was well under their online upload limit of 20 MB. After my map had uploaded, I was able to preview it on my banner. My map ended up being a tiny bit smaller than the banner size, so I just centered my map on the banner, chose my background color and saved my banner design. I could have also added text or clipart to my design if I desired, but I decided to keep my banner relatively simple. At the end, I was able to view a larger proof of my banner before completing my order.

The Banners On The Cheap checkout process was very simple. Before finalizing your order, you can change your banner type, size, and whether you want single or double-sided. All of this likely depends on the banner size that you select in the beginning of the process. You can also choose to add options for easy hanging, which I decided I didn’t need for my table-top dungeon map.

I placed my order at Banners On The Cheap, and they shipped it the next day. A few days later, I received my banner via UPS. It came rolled up length-wise in a box that measured approximately 4" x 4" x 4 1/2'. The map is centered on the black background exactly how I placed it in on their website. There is also a white border around the entire deisgn, which may be an automatic feature of this type of banner. The banner seems to be very durable, with a consistency similar to a large table-mat. I tested the surface with water and am pleased to report that nothing smudged or smeared.

Here are a few pictures of the banner:

RPG Map Banner
Full Length Banner Shot

Map Close-Up
Close-Up Section of the Banner

Map Side View
Dungeon Map Banner Side View


As far as the map looks, everything is exactly as I designed it. The one exception is that the print appears to have bled into the banner material a little bit, so the resolution is not quite as sharp as my original .jpg file. This won't be an issue for the functionality of the map, as the fine print (room numbers) is still very legible and everything else on the map (symbols, etc.) is larger and/or very readable. The colors are distinct as well, with no issues.

Overall, I am very pleased with my finished product. The banner looks as though it would last for many years. My one recommendation to anyone wanting to produce a similar banner would be to keep your map scale somewhat large (my dungeon squares are about 3 per inch, which seems to work well.) If I had printed the same map on a 2' x 4' banner, I'm guessing that the room numbers would have been less legible. I would think that an overworld map would have the same issue with the small print (city names, etc.)

Thanks to Banners On The Cheap for producing a fine and creative product!

Thursday, July 12, 2012

Make Your Own Dungeon


I just stumbled upon a nifty little dungeon creation tool. It's called Ye Olde Map Maker, and you can definitely use it to make some simple dungeon layouts.

The map making tool has sections for Walls, Doors, Windows, and 2 Object Menus. The Walls Menu has the most options, with 26 different wall sections, each of which can be rotated by 45 degree increments. The Doors Menu only has a couple of door types, but you could also use the Windows menu for doors if you chose to. The Object Menus have a few generic object types, but this tool would be greatly enhanced if the Object Menus were expanded.

The map maker has a nice parchment look to it, perfect for displaying your dungeon creations. Here's a design that I created in a few minutes with the map maker:

Ye Olde Map Maker Dungeon

As you can see, I was able to populate my mini dungeon with pillars, beds, chairs, stairs and more. The diagonal wall sections can be a little tricky to use at first, but you'll quickly learn how everything fits together. I would think that this tool would be perfect for designing levels of a small tower, for instance. There are some outdoor objects in the second Object Menu, so it's not out of the question that you could also create an outdoor map with this tool.

Wednesday, July 11, 2012

Terrain Generator


When playing solo RPG's, I've used random terrain generation as a way to either create a wilderness area map, or randomly create an adventure map space-by-space as you go. Here's a custom random terrain system that I developed for this purpose.

First, you need to determine the terrain in the starting space. If starting in a town or other landmark, that space should still be allotted a terrain type. Roll on this table:

Basic Terrain Table
Terrain Types d100
Badlands 01-06
Desert 07-12
Forest 13-25
Hills 26-40
Jungle 41-47
Mountains 48-55
Plains 56-81
Swamp 82-88
Tundra 89-92
Water 93-100

Once the terrain of the first space is determined, use the following list to determine the terrain of the next space. The next space can be in any direction, but must be adjacent to the previous space for which terrain was generated.


Terrain is normally determined randomly from the previous square.
Roll d100 to determine the new terrain type:
An 85 or lower (d100) indicates the same terrain type as the previous square.
An 86 to 98 indicates a roll on the Basic Terrain Table (above).
A 99 or 100 indicates a roll on the Special Terrain Table.  The Special terrain square has the same basic terrain type as the prior square.

Notes:
If a player rolls a water square, they can not enter that square unless they have a means of crossing the water.
Any attempted travel to any undetermined square that is adjacent to the water square is determined as if the prior square was a water square.


Special Terrain Table
Prior Square
Special Terrain Badlands Desert Forest Hills Jungle Mountains Plains Swamp Tundra Water
Canyon 01-30 x 01-30 01-35 01-50 01-40 x x x x
Glacier x x x x x 41-55 x x 01-40 x
Hot Spring 31-40 x 31-50 36-45 x 56-65 01-20 x x 01-15
Island x x x x x x x x x 16-75
Lava Flow 41-50 x x 46-50 x 66-80 x x x x
Oasis x 01-20 x x x x x x x x
Plateau 51-85 x 51-100 51-90 x x 21-85 x 41-100 x
Quicksand x x x x 51-100 x x 01-70 x x
Sand Dunes x 21-100 x x x x x x x 76-100
Tar Pits 86-92 x x x x x 86-100 71-100 x x
Volcano 93-100 x x 91-100 x 81-100 x x x x

Descriptions of Each Special Terrain Type are listed below:
Canyon        A deep ravine. Canyons are notorious for the ambushes that often take place there.
Glacier         A massive body of ice. Travel across a glacier can be treacherous. Cold-loving creatures often have lairs there.
Hot Spring     A source of hot water that issues from the ground. Creatures that prefer warmth can often be found there.
Island         A small land mass in a water square. The island has its own terrain type, with an increased chance of encounters/special features.
Lava Flow     A source of molten rock bubbling up from the ground. Travel over lava flows can cause damage from the heat.
Oasis         An oasis is a fertile area within a desert. These are often inhabited.
Plateau         An area of flat, highland terrain. Dragons and other flying creatures make their homes there.
Quicksand     A solid-looking piece of ground that is particalarly viscous. These areas can not be avoided, and have a chance of swallowing their victims whole.
Sand Dunes     A hill made of sand. Dunes can contain the bones of creatures, and perhaps - the treasure that the creature carried.
Tar Pits         Pools of hot black tar that seep up from the ground. These cause damage, and have a chance of holding their victims fast.
Volcano         Mountains that actively spew forth smoke, ash or lava. These are very deadly to any who approach.

After the terrain is determined, roll d100 and consult the list below:       
Nothing                01-75          Nothing unusual in this square.
Encounter             76-95          Roll on the Encounter Table. (You will provide the Encounter Table)
Special Feature     96-100        Roll on the Special Feature Table.

Special Feature Table
Castle  01-05 
City  06-09 
Dungeon  10-20 
Fort  21-28 
Gate  29-30 
Inn  31-35 
Lair  36-45 
Mine  46-49 
Pool  50-59 
Road  60-69 
Ruins  70-74 
Tavern  75-80 
Temple  81-84 
Tower  85-86 
Town  87-92 
Village  93-100 

Descriptions of Each Special Feature Type are listed below:
Castle     A huge stone complex. These are always inhabited by someone…
City    
A thriving metropolis. This is the largest type of civilization.
Dungeon    
A strange door in the wilderness leading to who knows where?
Fort    
A small garrison that may or may not be occupied. Normally used for military tactics.
Gate    
A magic teleporter that will transport to another space on the map (may also be a gate there).
Inn    
A place to spend the night.
Lair    
An area that some creature(s) is using for their dwelling place.
Mine    
A complex of underground tunnels fashioned for the excavation of precious metals or stones.
Pool    
A small, circular body of water. These are sometimes magical.
Road    
A quicker way to travel. These often lead to civilization.
Ruins    
Formerly a castle or fort, now a pile of rubble. The undead often gather here.
Tavern    
A place to have some drinks, play cards and recruit hirelings.
Temple    
A chapel or larger structure that provides healing services.
Tower    
A tall structure, known for housing wizards.
Town    
A smaller version of a city.
Village    
A smaller version of a town.

More Online Random Dungeon Generators


Following up on my previous post, here are a few more random dungeon generators that you can find online.

The dungeon generator at Aeldan.com is pretty cool. You only have a few selection fields to modify your random dungeon, but you can choose from a variety of styles including the above "Standard Tileset" look. You can also specify room density and whether you want your rooms separated so that there's not a single thin wall between rooms. Room numbers are automatically generated and placed for you. The best part is that the dungeon maps are easily printable.


One random dungeon generator that's a little bit outside the box is DungeonBuilder. You select the dungeon size, number of rooms and maximum room size, and DungeonBuilder creates and randomly places the room for you. You then have to connect the rooms with corridors and doors manually by clicking on each space until you get the desired result. This kind of generator could be useful if you are using a Random Dungeon Generation Table (such as is found in the original DM's Guide).


The most intricate of today's Random Dungeon Generators can be found at the Myth Weavers website. Originally designed by Jamis Buck, this generator is one of the oldest ones out there. Choosing from 13 different selection fields, you can customize your random design by size, room density and door type (note the concealed door on room 14 in the map above.) This generator will give you a potentially large, quick map if you aren't looking for diagonal hallways or multi-faceted rooms.


Monday, July 2, 2012

Online Random Dungeon Generators


There are quite a few online random dungeon map generators out there. Some even have content generation as well.  Let's take a look at some of the better dungeon generators that you can find on the internet.

The Donjon Website will allow you to create random dungeons complete with dungeon contents, including Wandering Monsters, Traps and Treasure. There are 15 different customizable fields for you to create exactly what you're envisioning in a random dungeon. Perhaps my favorite feature is the drop-down menu with 14 different map types, including Parchment, Marble and Steampunk (shown above). The only negative is that I don't think there's a feature to make the rooms and corridors anything but rectangular.

An Interesting concept in map-making can be found at the Risus Monkey. This map-making tool uses 116 different morph types to generate a seamless connection of hand-drawn tiles. You can specify the width of your dungeon, and also how many tiles you want your dungeon to have. There's no content generator, but if you need a random dungeon that has that illustrated feel to it, this might be the tool for you.

Another random dungeon generator that appears to use tiles is Retro Crawl. With more of a polished look than Risus Monkey, this tool combines the hand-drawn look for caverns with the straight edges of normal dungeon corridors. This one numbers the rooms for you, and provides brief content descriptions of each numbered area. There are 7 different fields to help you customize your dungeon, too.